
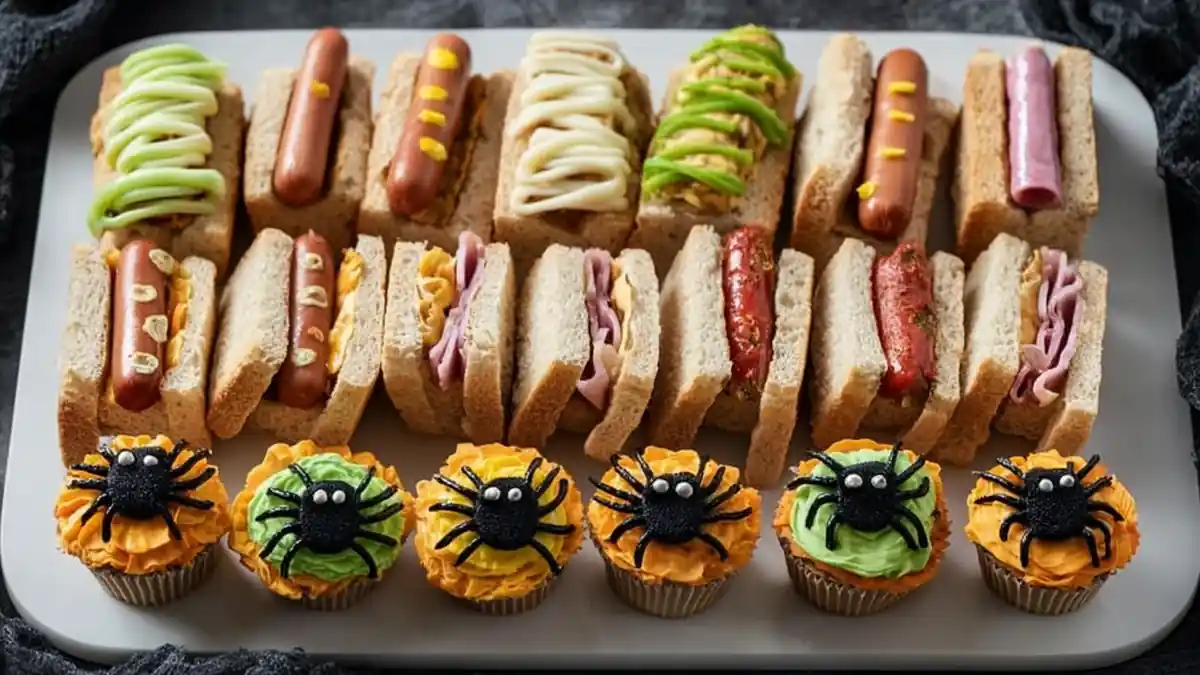
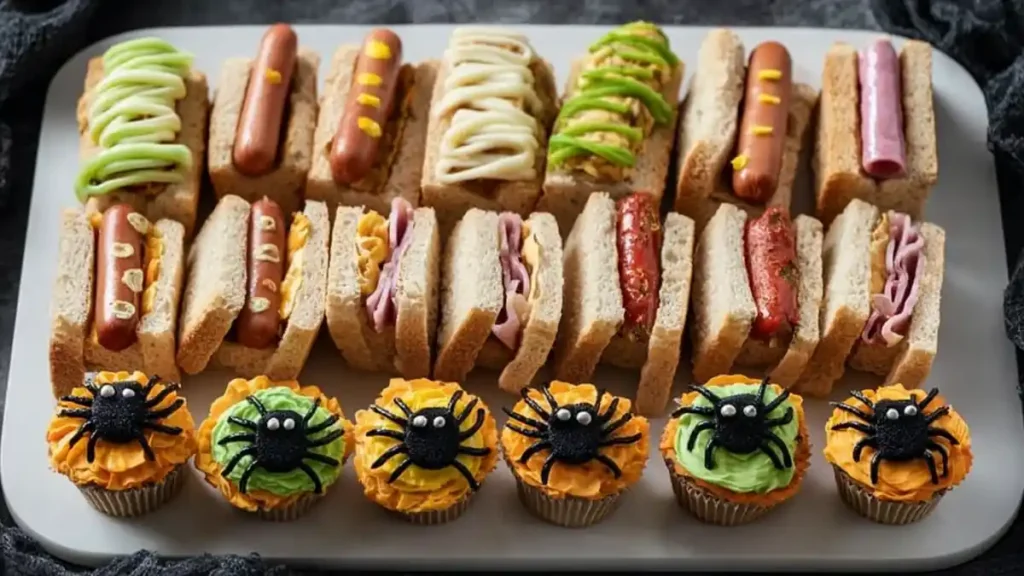
These 25 Halloween Party Finger Foods are so easy and delicious that they’ll bring fun to your spooky celebrations! Each bite-sized treat is designed to delight guests of all ages, making your party a hit. As the leaves change and the nights grow longer, there’s nothing quite like gathering with loved ones over food that feels hauntingly good.
Why You’ll Love These Spooky Snacks
Halloween is a time filled with whimsy and creativity. These 25 finger foods are perfect for sharing, whether you’re hosting a big party or a cozy family gathering. Each recipe is simple to make, and they all fit beautifully on a platter for your guests to nibble on as they enjoy each other’s company , and the tricks and treats of the evening!
How to Make Haunted Veggie Cups
Ingredients:
- 1 cup assorted fresh vegetables (carrots, celery, cherry tomatoes, cucumbers)
- 1 cup ranch dressing or hummus
- Plastic cups (clear, for a spooky look)
- Optional: fun garnish (eyeball candies or spooky stickers)
Directions:
- Chop the vegetables into sticks or bite-sized pieces.
- Pour a few tablespoons of ranch dressing or hummus into the bottom of each plastic cup.
- Arrange the cut vegetables upright in the dressing.
- For a festive touch, add some eyeball candies on top or attach spooky stickers to the cups.

How to Serve Your Haunted Veggie Cups
Place the cups on a festive table adorned with Halloween decorations to make them pop!
How to Store Spooky Veggie Cups
Cover tightly with plastic wrap and store in the fridge for up to two days.
Tips for Crafting Spooktacular Veggie Cups
For added fun, use black olives as ‘eyes’ on the veggie sticks, or create funny faces with the carrots and cucumbers.
Variations on This Veggie Delight
Try different dips like tzatziki or guacamole for other yummy flavors that complement the veggies.
FAQs
- Can I use frozen vegetables?
Yes, you can but fresh veggies are crunchier and have better flavor. - What other dips can I use?
You can use salsa, spinach dip, or a creamy avocado dip as great alternatives. - How long can I keep these veggie cups?
They will stay fresh for 1-2 days if stored properly in the refrigerator.
Spooktacular Mini Pizza Bites
These mini pizza bites are easy to prepare and a crowd favorite, with gooey cheese and your favorite toppings baked into each perfect portion. Perfect for Halloween, they are quick to make and irresistible!
Ingredients:
- 1 package of refrigerated pizza dough
- 1 cup pizza sauce
- 1 1/2 cups shredded cheese (mozzarella or your favorite)
- Assorted toppings (pepperoni, olives, bell peppers, etc.)
Directions:
- Preheat your oven to 400°F (200°C).
- Roll out the pizza dough and cut into small circles (can use a cookie cutter).
- Place the dough circles on a baking sheet lined with parchment paper.
- Spoon a little pizza sauce on each circle, sprinkle with cheese, and add your choice of toppings.
- Bake for 10-12 minutes or until golden brown.
How to Present Your Mini Pizza Bites
Arrange on a spooky platter decorated with cobwebs or Halloween-themed napkins.
How to Keep These Pizza Bites Fresh
Store in an airtight container for up to three days in the fridge or freeze for longer storage.
Clever Tips for the Ultimate Mini Pizzas
For a creepy look, use unusual toppings like green bell peppers cut into small monster shapes.
Fun Variations to Try
Swap pizza toppings for Halloween favorites, such as using sliced olives to create ‘spiders’ on top.
FAQs
- Can I make these ahead of time?
Yes, just prepare them and refrigerate until you’re ready to bake. - Are there gluten-free options?
Yes, use gluten-free pizza dough for a suitable alternative. - Can I use leftover pizza ingredients?
Absolutely! This is a great way to use up leftover toppings from your last pizza night.
Creepy Monster Meatballs
These monster meatballs are packed with flavor and perfect for dipping, making them a healthy yet delicious option for your Halloween spread. Each bite promises a burst of taste that’s sure to please everyone—from little goblins to grown-up ghouls.
Ingredients:
- 1 pound ground meat (beef, turkey, or a mix)
- 1/2 cup breadcrumbs
- 1/4 cup grated Parmesan cheese
- 1/4 cup fresh parsley, chopped
- 1 egg
- Salt and pepper to taste
- Spooky toothpicks or olives for decoration
Directions:
- Preheat the oven to 375°F (190°C).
- In a bowl, combine the ground meat, breadcrumbs, cheese, parsley, egg, salt, and pepper.
- Form into small balls and place on a baking sheet lined with parchment paper.
- Bake for 20-25 minutes until cooked through and golden.
- Stick an olive on top of each ball for a creepy ‘eyeball’ effect.
How to Serve Your Monster Meatballs
Arrange them on a platter with a side of marinara sauce for a ghoulish dipping experience.
How to Store Your Meaty Monsters
They can be stored in an airtight container in the fridge for up to four days.
Helpful Tips for Monster Meatballs
For added flavor, mix in spices like garlic powder or Italian seasoning to the meat mixture.
Spooktacular Variations
Try these with different meats, like chicken or vegetarian alternatives like lentils or black beans for non-meat options.
FAQs
- Can I freeze the uncooked meatballs?
Yes, these freeze well! Just defrost them and bake when you’re ready. - What can I use instead of breadcrumbs?
You can use crushed crackers or oats as a substitute. - What dipping sauces pair well?
BBQ, ranch, or even a spooky green sauce made with spinach and yogurt can be fun!
Tasty Witch’s Broomsticks
These witch’s broomsticks, made from pretzel sticks and cheese, are super easy to assemble and are always a hit with kids and adults alike. They have a whimsical look and a fun crunch, making them a perfect addition to any Halloween spread.
Ingredients:
- 12 pretzel sticks
- 6 cheese strings
- Fresh chives or green herbs for decoration
Directions:
- Cut each cheese string in half, then fray the ends to look like broom bristles.
- Attach a frayed piece to each pretzel stick, pushing it in slightly for stability.
- Tie a piece of chive or herb around the cheese to resemble the broom’s handle.
- Arrange them on a plate for a witchy look.
How to Enjoy Your Witch’s Broomsticks
Serve alongside a festive cheese platter or mirroring a spooky theme.
How to Store Your Broomsticks
Keep them in an airtight container for up to three days; best enjoyed fresh.
Charming Tips for Making Broomsticks
Use different cheese flavors like pepper jack or cheddar for varying tastes and colors.
Haunting Variants to Consider
You could also use fruit leather strips instead of chives for a colorful and playful look!
FAQs
- Can I use other types of sticks?
Yes! Breadsticks or even cookie sticks could work well. - Are these a good treat for kids?
Definitely! They are crunchy, cheesy, and fun to make! - What can I serve them with?
Pair them with dips like hummus or a sweet salsa for extra fun!
These 25 Halloween Party Finger Foods are not just about satisfying hunger; they’re about creating memories and putting a smile on everyone’s face. Whether you choose to whip up Creepy Monster Meatballs or want to start with Witch’s Broomsticks, rest assured that these delicious treats will elevate your spooky celebrations and make them unforgettable!